Actionable Notifications
Actionable notifications are a unique type of notification as they allow the user to add buttons to the notification which can then send an event to Home Assistant once clicked. This event can then be used in an automation allowing you to perform a wide variety of actions. These notifications can be sent to either iOS or Android.
Some useful examples of actionable notifications:
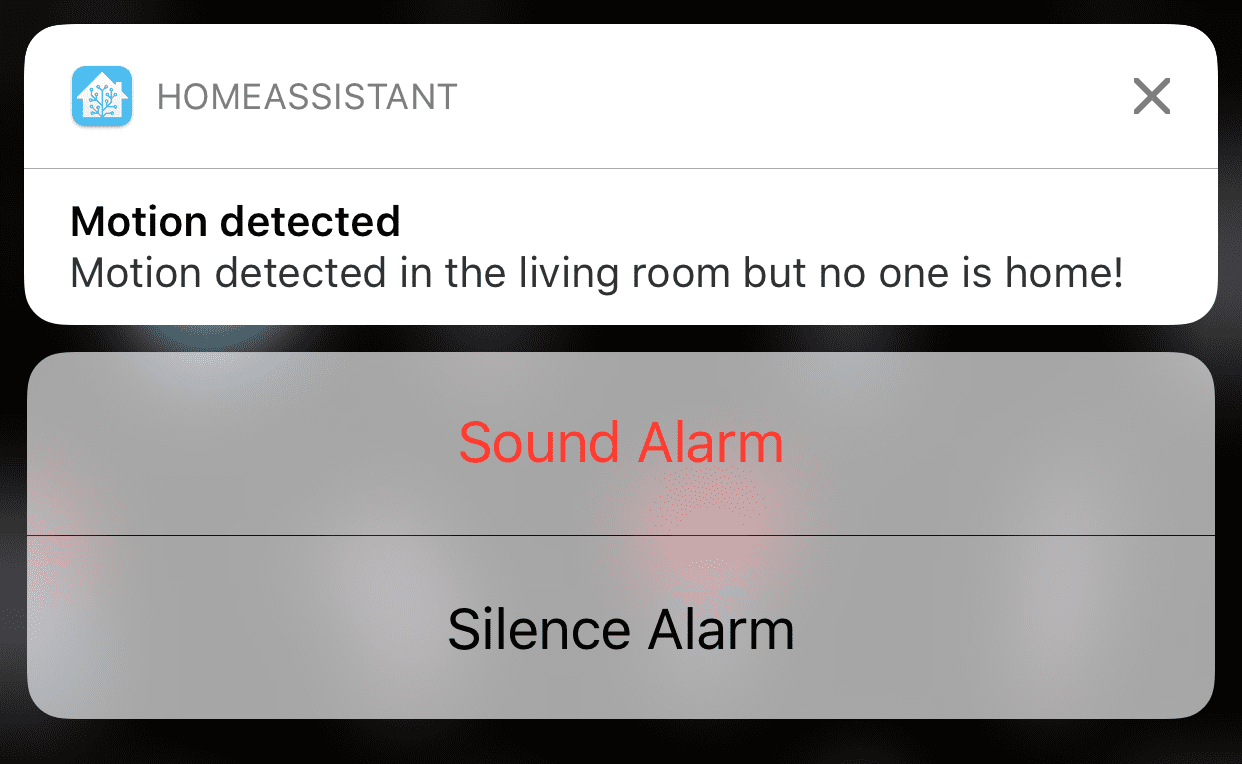
- A notification is sent whenever motion is detected in your home while you're away or asleep. A "Sound Alarm" action button is displayed alongside the notification, that when tapped, will sound your burglar alarm.
- Someone rings your front doorbell. You receive a notification with a live camera stream of the visitor outside along with action buttons to lock or unlock your front door.
- Receive a notification whenever your garage door opens with action buttons to open or close the garage.
![]() If you have multiple servers connected to an iOS or mac app, the notification actions will be fired on the server that sent the notification.
If you have multiple servers connected to an iOS or mac app, the notification actions will be fired on the server that sent the notification.
Category-based notifications on iOS and macOS are deprecated. See the migration guide for more info on converting existing notifications.
Actions on watchOS require the Watch App to be installed. You can install it the system Watch app.
Building actionable notifications
You can include an actions array in your action.
![]() Android allows 3 notification actions.
Android allows 3 notification actions.
![]() allows around 10 notification actions. Any more and the system UI for notification actions begins having scrolling issues.
allows around 10 notification actions. Any more and the system UI for notification actions begins having scrolling issues.
action: notify.mobile_app_<your_device_id_here>
data:
  message: "Something happened at home!"
  data:
    actions:
      - action: "ALARM" # The key you are sending for the event
        title: "Sound Alarm" # The button title
      - action: "URI" # Must be set to URI if you plan to use a URI
        title: "Open Url"
        uri: "https://google.com" # URL to open when action is selected, can also be a lovelace view/dashboard
Each action may consist of the following keys:
| Key | Meaning | Notes |
|---|---|---|
action | Required. The identifier passed back in events | When set to REPLY, you will be prompted for text to send with the event. |
title | Required. The title of the button shown in the notification | |
uri | Optional. The URL to open when tapped | action to URI to use this key. See notes below. |
behavior | Optional. Set to textInput to prompt for text to return with the event. This also occurs when setting the action to REPLY. | Using this key allows you to use the action key to differentiate actions. |
authenticationRequired | Optional. If true, the device needs to be unlocked to use the action. |
 Android specific options
All of the following keys are optional.
| Key | Meaning | Notes |
|---|---|---|
| None | There are no Android-specific keys at this time. |
 specific options
All of the following keys are optional.
| Key | Meaning | Notes |
|---|---|---|
activationMode | Set to foreground to launch the app when tapped. Defaults to background which just fires the event. | This is automatically set to foreground when providing a uri. |
destructive | true to color the action's title red, indicating a destructive action. | |
textInputButtonTitle | Title to use for text input for actions that prompt. | |
textInputPlaceholder | Placeholder to use for text input for actions that prompt. | |
icon | The icon to use for the notification. | Requires version 2021.10. See notes below. |
Icon Values
This requires iOS app version 2021.10 or later on iOS 15 or later, or a future version of the macOS app on macOS 12 or later.
Icons for notification actions are only allowed from the SF Symbols library, which is different than other icons in Home Assistant which come from Material Design Icons library. This is due to limitations placed on these actions from Apple.
You must prefix the icon name in the catalogue with sfsymbols: (similar to prefixing with mdi: elsewhere), since we hope to expand this to support MDI in the future. For example:
action:
  - action: notify.mobile_app_<your_device_id_here>
    data:
      message: "Something happened at home!"
      data:
        actions:
          - action: "ALARM"
            title: "Sound Alarm"
            icon: "sfsymbols:bell"
          - action: "SILENCE"
            title: "Silence Alarm"
            icon: "sfsymbols:bell.slash"
Snooze actions
On iOS and macOS the app adds snooze actions to notifications automatically, so you do not need to configure them. Snoozing hides the notification and shows it again after the amount of time you pick.
You can manage these under Settings > Companion app > Notifications > Snooze Actions. Some durations are enabled by default, and you can add your own durations or turn off the ones you do not want.
When a snoozed notification comes back, its title is prefixed with "↺" so you can tell it was snoozed.
Android 8.0+ natively supports snoozing notifications from any app, including Home Assistant. You may need to enable notification snoozing in the system settings for notifications.
uri values
To navigate to a frontend page, use the format /lovelace/test where test is replaced by your defined path in the defined view. If you plan to use a dashboard the format would be /lovelace-dashboard/view where /lovelace-dashboard/ is replaced by your defined dashboard URL and view is replaced by the defined path within that dashboard. For example:
- action: "URI"
  title: "Open Cameras"
  uri: "/lovelace/cameras"
Android specific
If you want to open an application you need to set the action to URI. The format will be app://<package> where <package> is replaced by the package you wish to open (ex: app://com.twitter.android). If the device does not have the application installed then the Home Assistant application will open to the default page.
- action: "URI"
  title: "Open X"
  # Name of package for application you would like to open
  uri: "app://com.twitter.android"
With action set to URI you can also trigger the More Info panel for any entity. The format will be entityId:<entity_ID> where <entity_id> is replaced with the entity ID you wish to view. Ex: entityId:sun.sun
- action: "URI"
  title: "View the sun"
  uri: "entityId:sun.sun"
You can also open the notification history when using the format settings://notification_history
- action: "URI"
  title: "Notification History"
  uri: "settings://notification_history"
![]()
You can also use an intent scheme URI to start an action in an installed application.
- action: "URI"
  title: "Intent Scheme"
  uri: "intent://scan/#Intent;scheme=zxing;package=com.google.zxing.client.android;end"
![]()
You can send a specific deep link to an app by using deep-link://<deep_link> where <deep_link> is the actual deep link you wish to send.
For example, to make a telephone call:
- action: "URI"
  title: "Call Pizza Hut"
  uri: "deep-link://tel:2125551212"
specific
You can also use application-launching URLs. For example, to make a telephone call:
- action: "CALL"
  title: "Call Pizza Hut"
  uri: "tel:2125551212"
Or to launch a page in your default browser:
- action: "OPEN"
  title: "Open Safari"
  uri: "https://example.com"
Building notification action scripts
There are some important things to keep in mind when building actionable notifications:
- Your script or automation could be run multiple times
- The actions for your notification are shared across all notifications
To avoid issues, you can create unique actions for each time your script is run. By combining context and variables, this can be fairly straightforward:
# inside a automation actions or script sequence
- alias: "Set up variables for the actions"
  variables:
    # Including an id in the action allows us to identify this script run
    # and not accidentally trigger for other notification actions
    action_open: "{{ 'OPEN_' ~ context.id }}"
    action_close: "{{ 'CLOSE_' ~ context.id }}"
- alias: "Ask to close or open the blinds"
  action: notify.mobile_app_<your_device>
  data:
    message: "The blinds are half-open. Do you want to adjust this?"
    data:
      actions:
        - action: "{{ action_open }}"
          title: Open
        - action: "{{ action_close }}"
          title: Close
- alias: "Wait for a response"
  wait_for_trigger:
    - platform: event
      event_type: mobile_app_notification_action
      event_data:
        # waiting for the specific action avoids accidentally continuing
        # for another script/automation's notification action
        action: "{{ action_open }}"
    - platform: event
      event_type: mobile_app_notification_action
      event_data:
        action: "{{ action_close }}"
- alias: "Perform the action"
  choose:
    - conditions: "{{ wait.trigger.event.data.action == action_open }}"
      sequence:
        - action: cover.open_cover
          target:
            entity_id: cover.some_cover
    - conditions: "{{ wait.trigger.event.data.action == action_close }}"
      sequence:
        - action: cover.close_cover
          target:
            entity_id: cover.some_cover
The above sends a notification, waits for a response, and then performs whichever action is being requested.
When the notification action is performed, the mobile_app_notification_action event fires with the following data:
{
    "event_type": "mobile_app_notification_action",
    "data": {
        "action": "OPEN_<context_id_here>",
        // will be present:
        // - when `REPLY` is used as the action identifier
        // - when `behavior` is set to `textInput`
        "reply_text": "Reply from user",
        // iOS-only, will be included if sent in the notification
        "action_data": {
          "entity_id": "light.test",
          "my_custom_data": "foo_bar"
        },
        // Android users can also expect to see all data fields sent with the notification in this response such as the "tag"
        "tag": "TEST"
    },
    "origin": "REMOTE",
    "time_fired": "2020-02-02T04:45:05.550251+00:00",
    "context": {
        "id": "abc123",
        "parent_id": null,
        "user_id": "123abc"
    }
}
Further Considerations
Blocking Behaviour
The above example will wait, until the notification action is performed. This might lead to unexpected behaviour, depending on the automation mode of the script. For "single" mode, this will lead to a situation, where the script is not executed again if the previous notification action has not yet been performed. For "queue" and "parallel" this will happen if a certain number of notifications have not yet been performed. For "restart" mode it means, that as soon as the script is triggered again notification actions of the older instances of the script will not fire the coresponding action. Depending on the use case, there are several options:
- You can use a time out to allow new executions of the script. However, this will lead to dangling notifications on your mobile phone.
- It is possible to clear notifications which can be combined with timeouts and parallel execution mode to achieve good results.
- In Android you can listen to the notification cleared event that is fired when the notification is closed, and handle it accordingly. This can be achieved by adding the following lines
      - platform: event
        event_type: mobile_app_notification_cleared
        event_data:
          action_1_key: '{{ action_open }}'
and
    - conditions: "{{ wait.trigger.event.event_type == 'mobile_app_notification_cleared' }}"
      sequence:
          - action: persistent_notification.create
            data:
              title: App notification result
              message: The notification was closed
Keep in mind that the event will not be fired when the Home Assistant app crashes or is closed, so a timeout should still be considered.
Catch All Triggers
You can also create automations that trigger for any notification action. For example, if you wanted to include a SILENCE action on a variety of notifications, but only handle it in one place:
automation:
  - alias: "Silence the alarm"
    trigger:
      - platform: event
        event_type: mobile_app_notification_action
        event_data:
          action: "SILENCE"
    action:
      ...
Migrating from Categories
Starting in iOS version 2021.5, actions are specified inline with notifications. To migrate, do the following:
- Add the
actionsarray to each notification. For example:
# original
action:
  - action: notify.mobile_app_<your_device_id_here>
    data:
      message: "Something happened at home!"
      data:
        push:
          category: "ALARM"
        url:
          _: "/lovelace/cameras" # if the notification itself is tapped
          ALARM: "/lovelace/alarm" # if the 'ALARM' action is tapped
# replacement
action:
  - action: notify.mobile_app_<your_device_id_here>
    data:
      message: "Something happened at home!"
      data:
        url: "/lovelace/cameras" # launched if no action is chosen
        actions:
          # for compatibility, the YAML definition of actions can be used
          # for example, you may use `identifier` instead of `action`
          - action: "ALARM"
            title: "Sound Alarm"
            destructive: true
            uri: "/lovelace/alarm"
          - action: "SILENCE"
            title: "Silence Alarm"
- Convert your event triggers to the new values
# original
automation:
  - alias: "Sound the alarm iOS"
    trigger:
      - platform: event
        event_type: ios.notification_action_fired
        event_data:
          actionName: "ALARM"
    action:
      ...
# replacement
automation:
  - alias: "Sound the alarm iOS"
    trigger:
      - platform: event
        event_type: mobile_app_notification_action
        event_data:
          action: "ALARM"
    action:
      ...
The above is the minimum necessary to migrate. You can also rewrite your automations to use wait_for_trigger like previous examples, though this is more work and not strictly necessary.
Compatibility with different devices
![]() Specific
Specific
All devices support notification expanding by performing a right to left swipe and pressing 'View' in the lock screen or pressing and holding. If you're not in the lock screen, you can also pull the notification down to expand it.