Introduction
The mobile_app notify platform accepts the standard title, message and target parameters used by the notify platform. The mobile_app notify platform supports targets as services. As long as you granted notifications permissions during setup, you will find all your devices listed as targets for the notify action with names prefixed notify.mobile_app_ followed by the Device ID of your device. This can be checked in the Companion App menu of the Home Assistant Configuration menu and defaults to the name specified in the General>About within the iOS/macOS settings app or under About>Phone in Android settings (with spaces and non alphanumeric characters replaced by underscores). A requirement of the notify platform is that you must specify at least message: in your payload. A minimum working example of a notification is:
automation:
  - alias: 'Send Notification'
    trigger:
      ...
    action:
      - action: notify.mobile_app_<your_device_id_here>
        data:
          message: "Notification text"
The mobile_app platform provides many enhancements to the simple notification generated above. The image below, for example, shows an iOS actionable notification allowing you to trigger different automations from each button.
The Wear OS app has support for some notification features. Please check the docs to see what is currently supported.
Sending notifications to multiple devices
To send notifications to multiple devices, create a notification group:
notify:
  - name: ALL_DEVICES
    platform: group
    services:
      - action: mobile_app_iphone_one
      - action: mobile_app_iphone_two
      - action: mobile_app_ipad_one
      - action: mobile_app_pixel_4_xl
Now, you can send notifications to everyone in the group using:
  automation:
    - alias: "Notify Mobile app group"
      trigger:
        ...
      action:
        - action: notify.ALL_DEVICES
          data:
            message: "Something happened at home!"
General Options
Attachments
You can attach media and other content to notifications. See Attachments.
Opening a URL
When tapping on a notification, you can choose to open a URL, which can fall into one of the following buckets:
- A relative URL to your Home Assistant instance, like
/lovelace/test. If you have multiple servers connected to an iOS or mac app, relative URLs will be treated with respect to the server that sent the notification.
- An full URL like
https://example.com - For a particular action in Actionable Notifications, see its documentation.
 An application using
 app://<package name>where<package name>is replaced with the actual package you wish to open.- The More Info panel of an entity using
entityId:<entity_ID>where<entity_id>is replaced with the entity ID you wish to view. Ex:entityId:sun.sun. - You can also open the notification history by using
settings://notification_history - You can also use an intent scheme URI to start an action in an installed application.
- You can send a specific deep link to an app by using
deep-link://<deep_link>where<deep_link>is the actual deep link you wish to send. - If you prefer to not open the app by default and instead do nothing you can use
noAction.
For relative URLs, you can open a lovelace view in the format /lovelace/test where test is replaced by your defined path in the defined view or a lovelace dashboard in the format /lovelace-dashboard/view where /lovelace-dashboard/ is replaced by your defined dashboard URL and view is replaced by the defined path within that dashboard.
automation:
  - alias: "Notify of Motion click action"
    trigger:
      ...
    action:
      - action: notify.mobile_app_<your_device_id_here>
        data:
          title: "Motion Detected in Backyard"
          message: "Someone might be in the backyard."
          data:
            # iOS URL
            url: "https://google.com"
            # Android URL
            clickAction: "https://google.com"
automation:
  - alias: "Send Notification with a link"
    trigger:
      ...
    action:
      - action: notify.mobile_app_<your_device_id_here>
        data:
          title: "Motion Detected in Backyard"
          message: "Someone might be in the backyard."
          data:
            # iOS URL
            url: "/lovelace/cameras"
            # Android URL
            clickAction: "/lovelace/cameras"
The below sections for Grouping, Replacing and Clearing do not take multiple servers into account. If you use the same text for group or tag you should expect to see the same behavior regardless of which server sent the notification. You may consider adding the server name to the current text to make the behavior server specific.
Grouping
Combine notifications together visually.
![]() does not support grouping critical notifications.
does not support grouping critical notifications.
automation:
  - alias: "Notify Mobile app grouping"
    trigger:
      ...
    action:
      - action: notify.mobile_app_<your_device_id_here>
        data:
          title: "Smart Home Alerts"
          message: "Something happened at home!"
          data:
            group: "example-notification-group"
Replacing
Replace an existing notification by using a tag for the notification. All subsequent notifications will take the place of a notification with the same tag.
![]() does not support replacing critical notifications.
does not support replacing critical notifications.
automation:
  - alias: "Notify of Motion iOS replacement"
    trigger:
      ...
    action:
      - action: notify.mobile_app_<your_device_id_here>
        data:
          title: "Motion Detected in Backyard"
          message: "Someone might be in the backyard."
          data:
            tag: "backyard-motion-detected"
![]() Do not use the same
Do not use the same tag in a different group to avoid unexpected behavior.
Clearing
Clearing a notification on iOS requires app version 2021.5 or later.
You can clear an existing notification which has a tag by sending clear_notification.
Platform limitations may require the companion app to have been recently used to clear the notification: this applies for all iOS notifications, and any Android notifications not marked as critical.
![]() will only clear the most recent critical notification from a given tag.
will only clear the most recent critical notification from a given tag.
automation:
  - alias: "Notify of Motion clear notification"
    trigger:
      ...
    action:
      - action: notify.mobile_app_<your_device_id_here>
        data:
          message: "clear_notification"
          data:
            tag: "backyard-motion-detected"
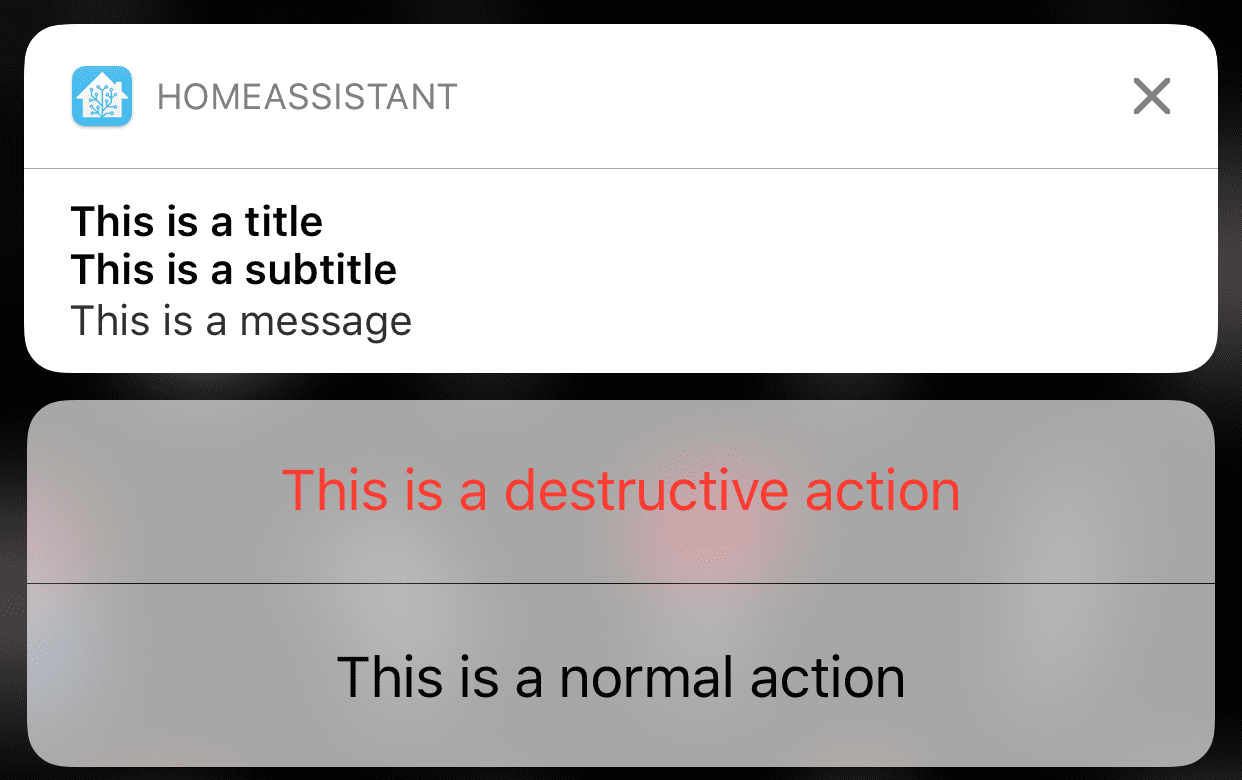
Subtitle / Subject
Subtitles and subjects are secondary headings you can use in your notifications beyond the title property.
![]()
![]()
A subtitle displays in addition to title and message.
![]()
A subject may take the place of longer content (more than 6 lines), depending on your device.
automation:
  - alias: "Notify Mobile app subtitle"
    trigger:
      ...
    action:
      - action: notify.mobile_app_<your_device_id_here>
        data:
          title: "Smart Home Alerts"
          message: "Something happened at home!"
          data:
            # iOS example
            subtitle: "Subtitle goes here"
            # Android example
            subject: "Subject for long text"
Android Specific
Notification Color
In Android you can set the color of the notification, you can use either the color name or the hex code.
automation:
  - alias: "Notify of Motion color"
    trigger:
      ...
    action:
      - action: notify.mobile_app_<your_device_id_here>
        data:
          title: "Motion Detected in Backyard"
          message: "Someone might be in the backyard."
          data:
            color: "#2DF56D" # or "red"
Sticky Notification
You can set whether to dismiss the notification upon selecting it or not. Setting sticky to 'true' will keep the notification from being dismissed when the user selects it. Setting it to 'false' (default) will dismiss the notification upon selecting it.
automation:
  - alias: "Notify of Motion sticky"
    trigger:
      ...
    action:
      - action: notify.mobile_app_<your_device_id_here>
        data:
          title: "Motion Detected in Backyard"
          message: "Someone might be in the backyard."
          data:
            sticky: "true" # or "false"
Notification Channels
Notification channels (on some devices: notification categories) allow you to separate your notifications easily (i.e. alarm vs laundry) and customize aspects like the notification sound and a lot of other device specific features. Devices running Android 8.0+ are able to create and manage notification channels on the fly using automations. Once a channel is created you can navigate to your notification settings and you will find the newly created channel, from there you can customize the behavior based on what your device allows.
Creating a channel
In order to create a notification you will need to specify the channel you wish to use. By default all notifications use General if channel is not defined.
In the example below a new channel will be created with the name Motion:
automation:
  - alias: "Notify of Motion channel"
    trigger:
      ...
    action:
      - action: notify.mobile_app_<your_device_id_here>
        data:
          title: "Motion Detected in Backyard"
          message: "Someone might be in the backyard."
          data:
            channel: "Motion" # Name of the channel you wish to create or utilize
Default values for a channel if not provided will be as follows:
- Importance: Default which means Default notification importance: shows everywhere, makes noise, but does not visually intrude.
- Vibration Pattern: Vibration disabled
- LED Color: LED disabled
Removing a channel
If you wish to remove a channel you will need to send message: remove_channel with the channel you wish to remove.
Removing a channel doesn't reset the settings to the default values, it just removes it from the notification channels list. If you send a notification to a removed channel, it will restore it. The only way to really remove a channel is by clearing the app data which will remove everything.
Depending on when you installed the app you may want to send remove_channel to channel: default to clean up the old default channel:
automation:
  - alias: Removing Motion channel
    trigger:
      ...
    action:
      - action: notify.mobile_app_<your_device_id_here>
        data:
          message: "remove_channel"
          data:
            channel: "Motion" # Name of the channel you wish to remove
Specific channel properties
If your device is on Android 8.0+ the following properties will become the default for the channel the first time they are set:
These options will be ignored once they are set for a particular channel, only lowering of the importance will work (if the user has not already modified this).
Devices running Android 6-7.1.2 do not have channels and do not need to worry about this note.
Notification Channel Importance
When you are setting the channel for your notification you also have the option to set the importance for the channel per notification. Possible values for this property are high, low, max, min and default. To learn more about what each value does see the FCM docs. For devices before Android 8.0 this property can be used like priority with the same options described up above.
See Specific channel properties for important behavior of this property.
automation:
  - alias: "Notify of Motion channel importance"
    trigger:
      ...
    action:
      - action: notify.mobile_app_<your_device_id_here>
        data:
          message: "Motion Detected"
          data:
            channel: "Motion" # For devices on Android 8.0+ only
            importance: high
Notification Vibration Pattern
You can set the vibration pattern for the channel by setting the vibrationPattern property. Possible values are a list of numbers. eg. "100, 1000, 100, 1000, 100" etc.. The pattern specification is "off time, on time, off time, on time, off time" etc.
See Specific channel properties for important behavior of this property.
automation:
  - alias: "Notify of Motion vibration"
    trigger:
      ...
    action:
      - action: notify.mobile_app_<your_device_id_here>
        data:
          message: "Motion Detected"
          data:
            vibrationPattern: "100, 1000, 100, 1000, 100" # The pattern you wish to set for vibrations
            channel: "Motion" # For devices on Android 8.0+ only
Notification LED Color
Some Android devices have a multi-color notification LED. By setting the ledColor property you can control what color the LED will flash. Possible values are the same as for property color eg '#2DF56D' # or 'red'.
See Specific channel properties for important behavior of this property.
automation:
  - alias: "Notify of Motion LED color"
    trigger:
      ...
    action:
      - action: notify.mobile_app_<your_device_id_here>
        data:
          message: Motion detected
          data:
            ledColor: "red" # Set the LED to red
            channel: "Motion" # For devices on Android 8.0+ only
Persistent Notification
Persistent notifications are notifications that cannot be dismissed by swiping away. These are useful if you have something important like an alarm being triggered. In order to use this property you must set the tag property as well. The persistent property only takes boolean (true/false) values, with false being the default. The persistent notification will still be dismissed once selected, to avoid this use sticky: true so the notification stays.
In the example below we will create a notification and then later on we will remove it.
automation:
  - alias: "Notify of Motion persistent"
    trigger:
      ...
    action:
      - action: notify.mobile_app_<your_device_id_here>
        data:
          message: "Motion detected"
          data:
            persistent: true # Set to true to create a persistent notification
            tag: "motion" # A tag is required for the persistent notification, it can be any value
Starting in Android 14 persistent notifications will be dismissable except when the device is locked or the "Clear All" button was selected.
To remove the persistent notification we send clear_notification to the tag that we defined.
automation:
  - alias: "Notify of Motion persistent remove"
    trigger:
      ...
    action:
      - action: notify.mobile_app_<your_device_id_here>
        data:
          message: "clear_notification"
          data:
            tag: "motion" # The tag for the persistent notification you wish to clear
Notification Timeout
You can set how long a notification will be shown on a users device before being removed/dismissed automatically. You may use the timeout property along with the value in seconds to achieve this.
automation:
  - alias: "Notify of Motion timeout"
    trigger:
      ...
    action:
      - action: notify.mobile_app_<your_device_id_here>
        data:
          message: "Motion Detected"
          data:
            timeout: 600 # How many seconds the notification should be received by the device
Notification Message HTML Formatting
You can add some custom HTML tags to the message of your notification.
automation:
  - alias: "Notify of Motion HTML"
    trigger:
      ...
    action:
      - action: notify.mobile_app_<your_device_id_here>
        data:
          message: >
            This is a <b><span style="color: red">HTML</span></b> <i>text</i><br><br>This is a text after a new line
          title: "Cool HTML formatting"
Not all devices support HTML formatting in notifications, and some formatting may not be shown in dark mode. When not supported, notifications will show unformatted text instead. Invalid HTML may lead to missing or improper text being displayed.
Notification Icon
You can set the icon for a notification by providing the icon_url. The URL provided must be either publicly accessible or can be a relative path (i.e. /local/icon/icon.png), more details can be found in attachments. It is important to note that if you set the image then Android will not show the icon for the notification, the image will be shown in its place. So the message will be shown with the image and with the image as the icon.
automation:
  - alias: "Notify of Motion icon"
    trigger:
      ...
    action:
      - action: notify.mobile_app_<your_device_id_here>
        data:
          message: "Motion Detected"
          data:
            icon_url: "https://github.com/home-assistant/brands/blob/master/core_integrations/_homeassistant/icon.png?raw=true"
Notification Sensitivity / Lock Screen Visibility
You can change how much of a notification is visible on the lock screen by using the visibility option. Possible values for this property are:
public: always show all notification contentprivate(default): visibility depends on your setting in the system Settings app > Notifications; if the option to show sensitive notifications when locked is enabled all notification content will be shown, otherwise only basic information such as the icon and app name are visiblesecret: always hide notification from lock screen
When you change the lock screen visibility specifically for Home Assistant notifications in the system settings to hide sensitive notification content when locked, this will also treat any public notifications as private and you will not be able to see the contents on a locked device.
automation:
  - alias: "Notify of Lost Device"
    trigger:
      ...
    action:
      - action: notify.mobile_app_<your_device_id_here>
        data:
          message: "This phone is lost, please return it to ..."
          data:
            visibility: public
Text To Speech Notifications
Instead of posting a notification on the device you can instead get your device to speak the notification. This notification works different than the others. You will set message: TTS and the actual text to speak would be in the tts_text. Current support is limited to the current Text To Speech locale set on the device. If there is an error processing the message you will see a toast message appear on the device. Check to make sure that the Speech Recognition & Synthesis engine is up to date and set as the default, in case you run into any issues.
automation:
  - alias: Notify of Motion TTS
    trigger:
      ...
    action:
      - action: notify.mobile_app_<your_device_id_here>
        data:
          message: "TTS"
          data:
            tts_text: "Motion has been detected"
By default Text To Speech notifications use the music stream so they will bypass the ringer mode on the device as long as the device's volume is not set to 0. You have the option of using media_stream: alarm_stream to have your notification spoken regardless of music volume.
automation:
  - alias: "Notify of Motion TTS alarm"
    trigger:
      ...
    action:
      - action: notify.mobile_app_<your_device_id_here>
        data:
          message: TTS
          data:
            tts_text: "Motion has been detected"
            media_stream: "alarm_stream"
If you find that your alarm stream volume is too low you can use media_stream: alarm_stream_max which will temporarily set the alarm stream volume to the max level, play the notification and then revert back to the original volume level.
automation:
  - alias: "Notify Alarm Triggered"
    trigger:
      ...
    action:
      - action: notify.mobile_app_<your_device_id_here>
        data:
          message: "TTS"
          data:
            tts_text: "Alarm has been triggered"
            media_stream: "alarm_stream_max"
You may not want the TTS notification to be spoken in certain situations (e.g. if the Ringer mode is not normal or DND is enabled). This can be done by adding a condition in your automation that checks the state of other sensors. Few examples are presented below:
automation:
  - alias: "Notify of Motion with conditions"
    trigger:
      ...
    condition:
      - condition: state
        entity_id: sensor.<your_device_id_here>_ringer_mode # Only speak if the Ringer is normal (not vibrate or silent)
        state: normal
      - condition: state
        entity_id: sensor.<your_device_id_here>_do_not_disturb_sensor # Only speak if DND is not enabled
        state: 'off'
      - condition: state
        entity_id: sensor.<your_device_id_here>_audio_mode # Only speak if the phone is idle (not ringing or in a call)
        state: normal
      - condition: state
        entity_id: binary_sensor.<your_device_id_here>_music_active # Only speak if the phone is not playing music
        state: 'off'
    action:
      - action: notify.mobile_app_<your_device_id_here>
        data:
          message: TTS
          data:
            tts_text: Motion has been detected
Chronometer Notifications
You can create notifications with a count up/down timer (chronometer) by passing the chronometer and when options. This feature requires at least Android 7.0.
Do note that the notification will not disappear when the timer reaches 0. Instead, it will continue decrementing into negative values. You may want to utilize notification timeouts or replace the notification when the timer hits zero.
- chronometer - true to enable chronometer mode
- when - the timestamp to count up or down to (seconds since 01/01/1970)
- when_relative - true makes the value of "when" relative in seconds like "timeout"
automation:
  - alias: Notify of Next Alarm Time
    trigger:
      ...
    action:
      - action: notify.mobile_app_<your_device_id_here>
        data:
          title: "Next Alarm"
          message: >-
            Next Alarm At {{ states('sensor.<your_device_id_here>_next_alarm') }}
          data:
            timeout: 120
            chronometer: true
            when: 120
            when_relative: true
Progress Notifications
You can create notifications with a progress bar by passing the progress option.
The notification requires constant updates to track the progress. Make sure to use tag to replace the existing notification. Once the process has completed you can remove the progress bar by sending a progress value of -1.
- progress - current progress value
- progress_max - max value of your progress (defaults to
1) - progress_indeterminate -
truemakes the progress bar not showing a specific progress but instead a continuous animation (defaults tofalse)
automation:
  - alias: Notify of file transfer progress
    trigger:
      ...
    action:
      - action: notify.mobile_app_<your_device_id_here>
        data:
          title: "File Transfer"
          message: "File transfer in progress: 6 / 32 MB"
          data:
            tag: file-transfer
            progress: 6
            progress_max: 32
Live Updates
On Android 16.0+ you can create "Live updates" notifications. These notifications are pinned to the top of the notification shade and appear on the lockscreen and always-on display. They will also display as a chip in the status bar with an optional short text. This might vary by manufacturer.
For the notification to display as a "Live updates" notification, title must be provided.
live_update- set totrueto display as a "Live updates" notificationcritical_text- set an optional short text to display in the status bar chiplive_updatemust be set totrueas well- If there is not enough space in the status bar to show the text, only the icon will be displayed
- If the
chronometerparameter is used it will replace thecritical_textvalue
On Samsung devices you may have to enable "Live notifications for all apps" in developer options to make notifications show a chip in the status bar.
Basic configuration
automation:
  - alias: Notify a live update
    trigger:
      ...
    action:
      - action: notify.mobile_app_<your_device_id_here>
        data:
          title: "Live update"
          message: "This will show on the always-on display"
          data:
            live_update: true
            critical_text: "42%"
These screenshots show how the notifications will display in the statusbar (with or without critical text)


Configuration combined with progress, chronometer, tag and icon
automation:
  - alias: Notify a live update
    trigger:
      ...
    action:
      - action: notify.mobile_app_<your_device_id_here>
        data:
          title: Example notification showing progress
          message: Current progress is 42%
          data:
            live_update: true
            chronometer: true
            when: 315
            when_relative: true
            progress: 42
            progress_max: 100
            tag: live_progress_notification
            notification_icon: mdi:progress-helper
This screenshot shows how the above configuration will appear on the always-on display

Alert Once
On Android you have the option for making a notification only alert once on the device. This means it will only make a sound, vibrate and/or flash the LED once. Although it is not an Android requirement this feature will not appear to function if you do not have a tag set. This setting is set to false by default as each and every notification will alert the user. This feature makes use of the Alert Once API
  - alias: Notify one time
    trigger:
      ...
    action:
      - action: notify.mobile_app_<your_device_id_here>
        data:
          title: "One Time"
          message: "This will only alert me the first time"
          data:
            tag: "Alarm"
            alert_once: true
Notification Status Bar Icon
![]()
On Android you also have the option of changing the notification status bar icon to any icon on Material Design. By default the Home Assistant icon will appear. The expected format is the same in Home Assistant mdi:cellphone. If you provide an invalid icon name then no icon will be shown.
  - alias: Check your phone
    trigger:
      ...
    action:
      - action: notify.mobile_app_<your_device_id_here>
        data:
          title: "Cellphone icon"
          message: "This will show a cellphone icon in the status bar"
          data:
            notification_icon: "mdi:cellphone"
Android Auto visibility
By default Home Assistant notifications do not show up in the Android Auto interface. By adding car_ui: true, notifications will become visible and opening them from Android Auto will start the driving interface. For more details on how notifications work in Android Auto, review the Android Auto documentation.
  - alias: Send door unlocked alert
    trigger:
      ...
    action:
      - action: notify.mobile_app_<your_device_id_here>
        data:
          title: "Door unlocked"
          message: "Everyone left home but the door is still unlocked"
          data:
            car_ui: true
iOS/macOS Specific
Sounds
By default the default notification sound (Tri-tone on iOS) will be played upon receiving a notification. See the Sounds documentation for details of the available sounds and how to add custom sounds. The default notification sounds (Tri-tone) can be disabled by setting sound to none in the data payload:
automation:
  - alias: Make some noise
    trigger:
      ...
    action:
      - action: notify.mobile_app_<your_device_id_here>
        data:
          message: "Ding-dong"
          data:
            push:
              sound: none
Badge
You can set the app icon badge in the payload. The below example will make the app icon badge say 5:
automation:
  - alias: "Notify Mobile app update badge"
    trigger:
      ...
    action:
      - action: notify.mobile_app_<your_device_id_here>
        data:
          title: "Smart Home Alerts"
          message: "Something happened at home!"
          data:
            push:
              badge: 5
By setting the message to delete_alert you can silently update the app badge icon in the background without sending a notification to your phone.
![]() 2021.7 will automatically reset the badge to 0 when launching the app. You can control this behavior in Configuration > Companion App > Notifications.
2021.7 will automatically reset the badge to 0 when launching the app. You can control this behavior in Configuration > Companion App > Notifications.
Interruption Level
On iOS 15, you can set the interruption level of a notification, which has the following types:
| Value | Description | Overrides Focus |
|---|---|---|
passive | Quiet notifications without waking screen | No |
active | Default behavior | No |
time-sensitive | Important notifications | Yes |
critical | Critical notifications | Yes, even mute |
time-sensitive requires iOS/macOS-2021.12 or later.
You can read more about these levels in the Apple documentation.
By default, time-sensitive notifications will be read as an announcement. You can control what notifications are announced in the system Settings app > Notifications > Announce Notifications > Home Assistant.
This level is set in the payload. The below example delivers a passive notification:
automation:
  - alias: "Notify Mobile app banana status"
    trigger:
      ...
    action:
      - action: notify.mobile_app_<your_device_id_here>
        data:
          title: "Banana Status Update"
          message: "The bananas are ripe."
          data:
            push:
              interruption-level: passive
Presentation Options
By default, if the app is open (in the foreground) when a notification arrives, it will display the same as when the app is not active (in the background), with a visual alert showing notification contents, a badge update (if one was sent in the notification) and the sound of your choice. You can control how a notification is displayed when the app is in the foreground by setting the presentation_options string array. Allowed values are alert, badge and sound.
automation:
  - alias: "Notify Mobile app presentation"
    trigger:
      ...
    action:
      - action: notify.ALL_DEVICES
        data:
          message: "Something happened at home!"
          data:
            presentation_options:
              - alert
              - badge
Performing a Shortcut
You can perform a Shortcut when launching for a notification and have an event fire from the results. See Siri Shortcuts documentation.