Apple App Intents

With the Home Assistant Companion App, you can take advantage of Apple's App Intents and the Shortcuts app to carry out Home Assistant tasks with a tap or by using voice commands with Siri.
Getting Started - Example Shortcut
As an example, if you wanted to create a shortcut to turn on a light (light.porch in this example):
- Open the Shortcuts app (included by default with iOS, can be re-installed from the App Store if you deleted it)
- Tap the Plus icon at the top right to create a new shortcut.
- Tap Add Action, search for "Home Assistant" and select "Perform action".
- Tap "Server" and select the Home Assistant server you wish to perform the action on.
- Tap "Action" and scroll through (or search) the list of available actions to find
light.turn_on. - Tap "Action data" and enter the data in JSON format, for example
{"entity_id": "light.porch"}. - Tap next and enter or record a name/phrase to use with "Hey, Siri" to trigger the shortcut.
The final shortcut should look similar to this:
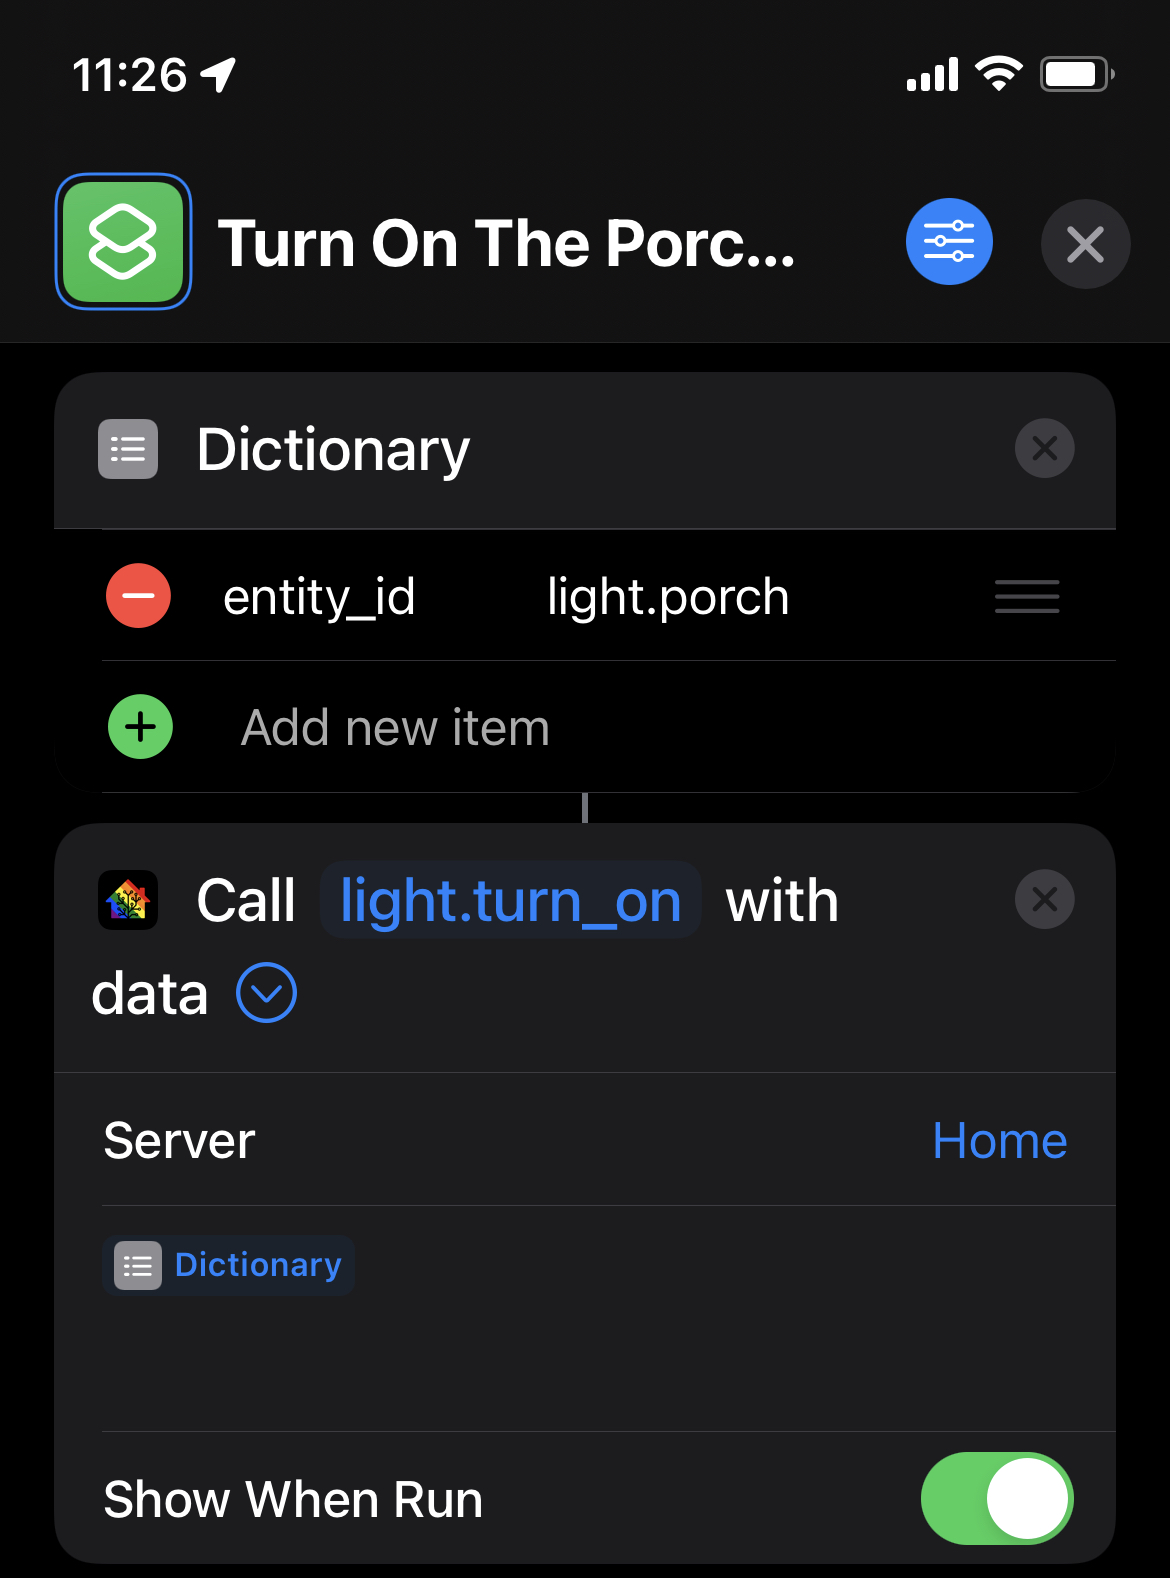
Shortcut Flow
Actions can pass data to subsequent actions in the Shortcut flow. This data can come from other apps, or from other actions provided by Home Assistant, such as "Render template" to get the state of an entity in Home Assistant. For example, instead of typing the action data manually in the example above, you could build it with a "Dictionary" action placed before the Home Assistant action. By default, empty fields will try to use data on your device's clipboard if no other flow or payload data is provided.
Actions
BETAThe Home Assistant Companion App provides the actions below, built with Apple's App Intents framework. They appear when you search for "Home Assistant" while adding an action in the Shortcuts app.
These actions replace the legacy SiriKit actions (such as "Call Service" and "Fire Event"). The legacy actions are deprecated and still appear in the Shortcuts app prefixed with "(Deprecated)" — please migrate your shortcuts to the actions described below. "Fire Event" has no direct replacement; use "Perform action" or a Home Assistant automation instead.
Action availability depends on your iOS version. Most actions require iOS 16.4 or later; "Perform action", "Get camera snapshot" and "Open Entity" require iOS 17 or later; and "Control light", "Control switch", "Control fan", "Control cover", "Press button", "Assist in app", "Open Page" and "Open Camera List" require iOS 18 or later.
Calling actions and controlling entities
Perform action
Perform any action set up in Home Assistant (see the Actions Page in Developer Tools) on the selected server. Choose the action and, optionally, provide the action data as JSON. As used in the example above.
For actions that return a response (such as weather.get_forecasts, calendar.get_events or todo.get_items), the response is returned as JSON so you can use it in subsequent steps of your Shortcut.
The action data must be valid JSON.
Activate scene
Activate a Home Assistant scene. You can optionally show a notification and/or trigger haptic feedback when it runs.
Run Script
Run a Home Assistant script. You can optionally show a notification and/or trigger haptic feedback when it runs.
Trigger automation
Trigger a Home Assistant automation. You can optionally show a notification and/or trigger haptic feedback when it runs.
Press button
Press a button entity in Home Assistant.
Control light
Turn a light on or off, or toggle its current state.
Control switch
Turn a switch (or input_boolean) on or off, or toggle its current state.
Control fan
Turn a fan on or off, or toggle its current state.
Control cover
Open or close a cover, or toggle its current state.
Assist
Assist prompt
Send a text prompt to Assist and get the response back to use in subsequent actions. You can choose which Assist pipeline to use.
Assist in app
Open the app and start Assist with the chosen pipeline. You can optionally start voice input immediately.
Templates and cameras
Render template
Render a template which can then be used in subsequent actions. Only users with the admin role can perform this action.
Get camera snapshot
Get a single still frame from a camera entity. The snapshot is returned as a PNG file that you can save or use in subsequent actions.
Opening the app
Open Page
Open the app and navigate to a specific dashboard page.
Open Entity
Open the app and show the selected entity (or the live view for camera entities).
Open Camera List
Open the app and navigate to the camera list, optionally on a specific server.
Device and app
Update location
Send a location update to Home Assistant. Will attempt to use the provided location, otherwise will use the current location. This is sent to all configured servers.
Update sensors
Send a sensor update to Home Assistant for all sensors, on all configured servers.
Reload widgets
Reload all Home Assistant widget timelines to refresh their data.
Launching Shortcuts
Shortcuts are deeply integrated into the OS. After creating one, you have numerous ways to launch them.
- Siri / Voice - You can launch any of your created Shortcuts using Siri from an iPhone, iPad, HomePod, or Apple Watch. If your shortcut is named "Bedtime" the command would be "Hey Siri, Bedtime."
- Widget - Shortcuts has a widget on the Today View which can be accessed by swiping right from the Home or Lock screen. At the bottom of the widgets screen, press "Edit" and then the green plus button to add the widget to your Today View.
- Shortcuts app - On the "My Shortcuts" tab, simply tap on the shortcut you want to launch. There is a search bar at the top to quickly filter your list of Shortcuts if needed.
- Apple Watch (watchOS 7) - With iOS 14 and watchOS7 you can launch Shortcuts from either the Shortcuts Apple Watch app, or via complications on the Siri watch face.
- Spotlight Search - When on your iOS device Home screen, swipe down from the center of your Home screen to bring up Spotlight search. From here you can type the name of a Shortcut and run it with one tap.
- Add to Home Screen - When editing any Shortcut, press the (...) button in the top right to see options, and press the "Add to Home Screen" button. You can customize the name and provide a custom icon if you wish.
- Push Notification - Shortcuts can be launched via push notifications.
- Back Tap (iOS 14) - Under iOS Settings > Accessibility > Touch > Back Tap, you can launch any Shortcut via double tapping or triple tapping the back of your iPhone.
Executing a Shortcut via Home Assistant Notifications
You can trigger a Shortcut from Home Assistant using a notification like so:
- action: notify.mobile_app_<your_device_id_here>
  data:
    message: "Trigger a Shortcut!"
    data:
      shortcut:
        name: "Shortcut Name"
        # you can provide any number of keys and values
        # all values must be strings (e.g. not numbers, arrays, dictionaries, etc.)
        key_for_shortcut: "value provided to shortcut"
        another_key: "another value"
When you tap on the notification to launch Home Assistant, it will redirect you to the Shortcuts app to perform the given Shortcut. You can customize this behavior with the following keys in shortcut above:
| Key | Values | Notes |
|---|---|---|
ignore_result | Any String, e.g. "ignore" | When set, does not re-open the Home Assistant app when completed. Also prevents the below event from firing. |
If the Shortcut doesn't require any input, it may appear as though the Shortcuts app wasn't launched at all. Check for the event being performed to see the results.
Once you complete the Shortcut, it'll return you to Home Assistant and fire an event. The event fired is ios.shortcut_run with the result of the Shortcut with the following keys:
| Key | Values | Description |
|---|---|---|
status | success, failure, cancelled | The status of the execution |
result | Varies | The result provided by the Shortcut itself |
error | Dictionary, keys error-Code and errorMessage | Error description from the Shortcuts app if failure |
input | Varies | shortcut value in action |
name | Varies | shortcut.name value in action |
Personal Automation
With Shortcuts Personal Automation, you can get the best of both worlds - by using iOS triggers to execute Home Assistant actions. A few examples of some useful iOS + Home Assistant combinations for inspiration:
- Trigger your Home Assistant "morning routine" automation after stopping or snoozing the Wake-Up alarm on your iPhone.
- When starting a workout on your Apple Watch, use Home Assistant to play your workout playlist. When finishing a workout on your Apple Watch, use Home Assistant to turn on your fan to cool down.
- Get perfect car presence in Home Assistant by toggling an
input_booleanin Home Assistant when you connect or disconnect from CarPlay, or connect to your cars Bluetooth system. - You can ensure that any Home Assistant automations using the iOS app's "Battery State" sensor run immediately by creating a Shortcuts personal automation with the "Charger" trigger (iOS 17) along with the "Update location" Home Assistant app action. An example use of this is triggering your bedtime routine automation immediately after your phone is plugged in at night time, rather than waiting for the next sensors background update.
- Place an NFC sticker on the lid of your pills bottle. Each time you take your medicine, scan the NFC sticker with your iPhone. Home Assistant can keep a log of the exact times you take your medicine, increment a counter which will help you know when to refill your prescription, and more.
To create a Personal Automation in the Shortcuts app, go to the "Automations" tab, press the "+" button in the top right corner, and then tap the "Create Personal Automation" button. If you don't have any existing Automations in the shortcut app, just tap the "Create Personal Automation" button. There are 21 triggers available on iOS 17. See Apple's Shortcuts user guide for more information on creating Personal Automations.
In iOS 17 all personal automation trigger types can run automatically without any interaction, except for the "Before I Commute" trigger.